


1. Primer para Reparo de Couro: Avaliar o Dano é o Primeiro Passo para o Sucesso
2. Antes de reparar couro danificado, é recomendado consultar um profissional de móveis ou outro vendedor de produtos de couro para identificar o dano do seu produto e assim decidir o método de reparo do produto de couro. Existem diferenças nos métodos de reparo de 3. couro artificial 4. e couro genuíno. Evite repará-lo da maneira errada e causar perdas desnecessárias. Se for um produto de couro barato, você pode tentar aprender sobre métodos de reparo de couro e tentar repará-lo. Para produtos de couro caros, é recomendado consultar o vendedor que lhe vendeu o produto.

5. Conheça o seu tipo de couro: genuíno, sintético ou artificial?
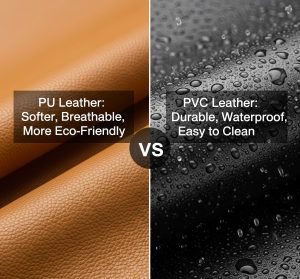
6. Existem vários tipos de produtos de couro ao nosso redor, incluindo couro genuíno (feito de pele de animal), couro artificial (PVC) e couro 7. sintético (PU)8. . Primeiro, é recomendado que você entenda que tipo de couro eles são para que possa repará-los da maneira correspondente e quais ferramentas de cuidado e reparo de couro devem ser usadas. Você pode descobrir o tipo de material de couro que possui consultando o comerciante que vende o produto, ou indo a uma agência de testes de materiais, mas isso lhe custará muito dinheiro.
9. Características dos diferentes tipos de couro e seu impacto nos métodos de reparo
| Comparison Dimension | Couro Genuíno | 10. Couro Sintético PU | 11. Couro Artificial PVC |
|---|---|---|---|
| 12. característica | 13. É natural, "respira", tem poros e absorve nutrientes. Possui excelente maciez e elasticidade, mas resseca e desenvolve rachaduras finas com o envelhecimento. | 14. É macio e elástico, com uma textura próxima à do couro genuíno e um certo grau de respirabilidade. Quando envelhece, o revestimento e o tecido base hidrolisam, aderem ou descascam. | 15. A textura é dura, plástica e completamente hermética. Com o envelhecimento, torna-se duro, quebradiço e racha na superfície devido à perda dos plastificantes internos. |
| 16. Fontes de Material | 17. Peles de animais (vaca, ovelha, etc.). | 18. A resina de poliuretano é um polímero de alta massa molecular. | 19. A resina de cloreto de polivinila (PVC) é essencialmente plástico. |
| 20. estrutura | 21. Uma rede tridimensional formada pelo entrelaçamento irregular de fibras naturais de colágeno. | 22. Estrutura em camadas de "revestimento de resina PU + tecido base (tecido não tecido, etc.)". | 23. Estrutura em camadas de "revestimento de mistura de resina PVC + tecido base". |
| 24. Método de reparo recomendado | 25. Reparo Nutritivo: Limpeza profunda e manutenção com detergentes, óleos nutritivos e cremes condicionadores. • Use corantes penetrantes para correção de cor. Para descascamento de tinta, use pastas de preenchimento e tintas especializadas para reparo de superfície. | 26. Reparo de superfície: Repare rasgos usando cola especial e juntas. Preencha rachaduras com preenchedor flexível. Repinte e sele a superfície usando tinta especial PU ou tinta vinílica. | 27. Reparo de Plástico:• Cole com cola vinílica forte e espaçadores.• Para pequenos arranhões, tente usar uma pistola de calor (requer grande habilidade) para aquecer suavemente a superfície e ajudar na fusão.• Cubra o dano com tinta/revestimento de retoque vinílico. |
| 28. Método de reparo não recomendado | 29. Vedação de Superfície: Usar cola forte e não respirável ou tinta dura endurecerá o couro, impedindo-o de respirar e acelerando a deterioração. Usar limpadores líquidos em couros altamente absorventes, como couro anilina. | 30. Manutenção por penetração: Use óleo nutritivo dérmico/creme de cuidado, pois a camada de PU não o absorve e apenas deixa uma camada oleosa. Use preenchedores ou tintas duras, pois o PU é muito macio e materiais duros cairão ou racharão facilmente. | 31. Qualquer nutrição ou manutenção: É estritamente proibido usar quaisquer produtos de cuidado de couro (óleo de cuidado, creme nutritivo), que são completamente ineficazes. Corantes convencionais não aderem à superfície de PVC. |
32. Habilidades simples de identificação de material de couro
33. 1. Observe a textura da superfície e os poros:
Couro genuíno:
34. • Textura irregular: Um exame minucioso da superfície do couro revela que a textura (poros e grão) do couro genuíno é irregular e desigual. Mesmo o couro em relevo terá uma textura naturalmente irregular por baixo.
35. • Poroso: Pequenos poros são visíveis, uma característica da pele animal e a fonte de sua respirabilidade. Dobrar ligeiramente o couro com os dedos revelará uma mudança natural no grão.
36. PU:
37. • Textura regular: O grão do couro PU é tipicamente criado através de um molde, resultando em uma textura muito uniforme, regular e até rígida. O grão é virtualmente idêntico em todas as áreas.
38. • Não poroso: A superfície é fechada, sem poros visíveis.
39. PVC:
40. • Textura mais artificial: O grão do PVC é frequentemente mais artificial e não natural, com uma forte sensação plástica.
41. • Não poroso: O PVC também não possui poros.
42. 2. Sinta a textura e a elasticidade com as mãos
43. • Couro genuíno: É macio, suave e elástico. Pressionar a superfície com os dedos produzirá pequenas rugas, que desaparecerão ou diminuirão naturalmente após soltar os dedos.
44. • PU: É semelhante ao couro genuíno e também relativamente macio, mas tem menos elasticidade. Quando pressionado, as depressões e rugas da superfície não se recuperam tão naturalmente quanto no couro genuíno.
45. • PVC: É duro e adstringente, como plástico. Quase não tem elasticidade e se recupera lentamente ou permanece inalterado após a pressão. Torna-se mais duro no inverno.
46. 3. Identifique o Odor
47. • Couro Genuíno: Possui um odor natural de couro ou de agente de curtimento leve que não é pungente.
48. • PU/PVC: Frequentemente tem um forte odor plástico ou químico, especialmente em produtos novos. O PVC é frequentemente mais pungente que o PU.
49. 4. Examine a Seção Transversal
50. • Couro Genuíno: Uma seção transversal revela uma estrutura fibrosa, composta por fibras densas, porém irregulares, com uma transição visível da superfície para as camadas internas.
• PU/PVC: A cross-section clearly reveals the layered structure. The bottom layer is a fabric base (such as cotton or non-woven fabric), with a foam layer and surface coating above. It lacks the natural, fibrous feel.
Comprehensive analysis of common leather damage types
- Friction from sharp objects (such as keys, zippers, and walls). Minor scratches can damage the surface coating, while severe scratches can puncture the leather.
- Leather subjected to heavy objects and held in the same position for extended periods can cause dead creases.
- Oil, water, dye transfer, and other stains that penetrate the leather surface can damage the surface coating.
- Color fading. Prolonged exposure to sunlight can cause the leather dye to break down, resulting in a lighter or even yellowing color.
- Lack of maintenance in dry environments can cause the leather to harden, lose its elasticity, and eventually crack at bends.
- Mold. Leather is susceptible to mold growth in damp, poorly ventilated environments, resulting in surface mildew. Mold can eat away at the leather, causing permanent stains.
Surface scratches and wear
In daily use, leather products, such as leather clothes and leather pants, often come into frequent contact with tables, benches, leather sofas, furniture, and other objects, causing the coating to disappear. Over time, it may become brittle or crack. Avoid contact with sharp objects. This type of damage mainly affects the outermost coating and dyeing layer of the leather, and usually does not damage the fibrous tissue of the dermis. Therefore, its severity is relatively low. Through professional cleaning, color touch-up, and coating repair, most surface scratches and wear can be well repaired and even restored to their original state.
Deep cuts, lacerations, and lacerations
If the leather is torn due to excessive force caused by a sharp object, this is a serious injury. This damage has penetrated the surface coating, cut the collagen fibers in the dermis, and destroyed the overall structural integrity of the leather. This is a serious injury. The repair process is relatively complicated and usually requires reinforcement from the back of the leather (applying a reinforcement sheet), then filling the gap with leather filling paste, and finally polishing, coloring and texture pressing. Although it can be repaired, it usually still leaves a mark when observed closely, like a “scar”.
Aging, cracking and peeling
Over time, due to prolonged lack of care and environmental influences, leather will dry out, crack, age, loosen, and oxidize. This is a structural breakdown of leather from within. Dry collagen fibers become brittle and break rather than stretch when subjected to stress. Peeling is essentially the separation of the finish from the severely damaged leather base. Extensive cracking and peeling signify the end of the leather’s lifespan. Repair is of little use because the base has lost its support. This is a highly serious injury, and prevention (regular cleaning and conditioning) is crucial.
Stains, stains and discoloration
This is chemical damage. When oil, water, or dye transfers to leather, it creates stains and stains on the surface. The damage occurs when foreign pigment molecules penetrate the leather’s surface or react with the leather’s original dye. The severity of this damage varies widely. Fresh surface stains and minor stains can be removed with specialized cleaners. However, deeply penetrated oil and ink stains, as well as discoloration caused by chemicals, are often permanent. Repairing this type of problem often requires re-dying the entire leather surface to achieve a uniform color.
Cigarette burns and thermal injuries
It is usually caused by falling cigarette butts, lighters or high-temperature objects, which will cause the surface to shrink, harden, turn black or carbonize, and the surface texture will disappear to form a bumpy shape. The high temperature causes the collagen fibers of the leather to undergo irreversible denaturation, just like raw meat being roasted. The structure of the leather is completely destroyed at the point of contact. This is an extremely serious and permanent damage. Since the material of the damaged area has changed fundamentally, conventional cleaning and coloring methods are completely ineffective. The only repair method is “surgical”: completely dig out the hardened part of the burn, then fill it with filling material, and then perform complex texture imitation and coloring. This kind of repair requires extremely high technicians, and it is difficult to achieve perfection.
The Art of DIY Repair: Home Solutions for Minor Damage
Minor damage caused by the use of leather products in daily life can be repaired by DIY, saving unnecessary costs, choosing the right repair tools and understanding the repair guide.

The Essential DIY Leather Restoration Toolbox
For leather DIY repair enthusiasts who want to do it themselves, a set of suitable leather repair tools is necessary. We have listed a series of items for dealing with stains, dyes, etc. to help you better DIY repair leather products.
Leather Cleaners and Conditioners
Cleaners are suitable for stains or oil stains on the leather surface, but not for absorbent leather, suede leather, nubuck leather, aniline leather, semi-aniline leather or after repair. Choose one that does not contain ammonia, phosphates or ozone-depleting chemicals, is non-flammable, soluble in fresh or salt water, and can be stored at room temperature.
Leather filling paste (wound repair paste) and adhesive
Filling paste is a special flexible colored filling paste used to cover cuts, holes or cracks in leather and synthetic leather, forming a soft, sticky and flexible layer
Reinforcement gaskets and backing materials
This tool can be used as a key material to reinforce and support the back of the damaged area during leather damage repair, providing it with a stable and solid base for subsequent filling and coloring repairs.
Leather Dye and Color Matching Kits
Whether you use it for leather sofas, wallets, leather dye is the best choice, it has penetrating, which means the dye will be absorbed by the leather and dye it, it has a dry even, easy to blend, can create attractive intermediate tones
Repair guide for minor scratches and scuffs
When leather products are damaged, our brains should not lose their way and try to repair them in the wrong way. We must search for professional answers from Google, such as how to repair sofa leather, how to repair clothing leather, and other related issues to avoid unnecessary losses.
Use leather care oil or mink oil to nourish and repair
Leather care oil deeply nourishes, which is equivalent to applying a layer of moisturizer to dry skin, making the leather fibers become plump, full and soft again. Then the elasticity of the leather will return to its original state, and the color will naturally deepen slightly and become more uniform.
Use the same color shoe polish or leather repair pen to touch up the color
When the previous step cannot completely remove the marks, we need to touch up the color with the same color shoe polish, which is mainly made of a mixture of wax, oil and dye. The wax and oil with a trace of dye penetrate and adhere to the leather surface, playing a temporary touch-up, covering and polishing effect. It is not a permanent “paint”; the repair pen can be called a paint pen, which contains a high-concentration, high-adhesion pigment. When using it, you need to understand that directly using opaque pigment to cover the scratches or wear to form a new layer of color coating.
Dealing with Cuts and Tears: Precision Repair Techniques
Repairing leather cuts and tears is one of the most demanding projects in DIY repair technology. It requires the leather products to maintain their original beauty and characteristics after repair. This is a very challenging repair process.

Preparation: Clean the wound edges
First of all, before repairing, we need to remove stains and other dirt from the damaged area of the leather product to ensure it is clean, and then use scissors to fine-tune the damaged edges.
Repair from the inside using leather glue and shims
Cut a piece of backing material 1-2cm larger than the wound to avoid covering the surrounding injured area
How to accurately place the back spacer
Use tweezers to carefully push the shim under the leather through the cut or tear. Using the other end of the scraper or tweezers, push the shim completely flat under the leather through the opening, making sure it covers the entire back of the wound area without any wrinkles.
Correct use of glue and fixing techniques
• Applying Glue: Use a small scraper or toothpick to apply a small amount of leather glue. Insert it through the opening and evenly apply it to the backing material and the backing of the leather around the edges of the cut.
• Precise Alignment: This is the most skill-intensive step. Immediately, gently press the two sides of the cut onto the glued backing, like a puzzle piece. Your goal is to create a minimal, almost seamless gap between the cuts. Use your fingertips to gently adjust the alignment until you find the perfect fit.
• Press and Secure: Once aligned, press the cut from the front of the leather to secure it to the underlying gasket. Masking tape can be used to hold the cut tight to prevent shifting during drying.
• Cleaning Spills: Immediately wipe away any glue that leaks out of the gap with a damp cloth.
• Complete Drying: Allow the glue to dry and cure completely according to the glue instructions. At this point, the leather’s structural strength has been largely restored.
Filling and leveling: making repairs invisible
• Initial Filling: Use a small scraper to apply a small amount of leather filler. At a 90-degree angle, perpendicular to the seam, firmly press the filler into and across the seam. This ensures that the filler completely fills the deepest part of the seam.
• Filling in Layers: Filler shrinks slightly as it dries. Therefore, apply the filler in 2-3 thin coats, allowing each coat to dry completely (this can be accelerated by using a hair dryer on low). The final coat should be slightly above the surface of the leather to allow for sanding.
Dealing with Cuts and Tears: Precision Repair Techniques
This is a terminal illness of artificial leather. It occurs when the plasticizers (chemicals that keep the material flexible) in the plastic layer evaporate, causing the plastic to become brittle, crack, and delaminate (peel) from the underlying fabric.
This damage is irreversible. There’s no way to restore brittle plastic to its original flexibility. Repair efforts aim to delay the damage and conceal its appearance.

Deep Cleaning and Oiling: Restoring Leather's Flexibility
Use a specialized, pH-neutral leather cleaner with a soft brush and towel to thoroughly remove dirt and old care product residue from deep within the leather’s pores and grain. This step opens the skin’s pores and prepares them for absorption of nutrients.
After the leather has completely dried, apply a high-quality leather conditioning oil or a more penetrating leather rejuvenator in small, frequent, and even applications. Allow the leather ample time (several hours or even a full day) to fully absorb the oil.
Fill cracks with flexible filler
After stabilization, the leather has become flexible, allowing the filling material to work with it. When the leather bends, the filler stretches with it rather than tearing. Applying filler directly to stiff leather would inevitably cause both the filler and the leather to crack again.
When choosing the right filling paste, be sure to look for products labeled “flexible” and “leather-specific.” These products are specially formulated to maintain excellent elasticity and adhesion after drying.
Repaint and seal the entire structure to restore its gloss.
• A careful repair technique requires using a small, flexible scraper, palette knife, or the edge of an old credit card before repairing.
• Start by applying a small amount of filler across the crack at a 45-degree angle. The key is to apply it horizontally or diagonally across the crack, rather than along it. This effectively packs the filler into the deepest part of the crack.
• Applying small amounts frequently is crucial. Avoid applying a large amount of filler at once. The correct technique is to apply the filler correctly: a thin first coat is applied to fill the base of the crack. Subsequent coats are applied thinly as needed, followed by a second and third coat. Since filler shrinks slightly as it dries, layering the filler creates the smoothest, strongest finish. The final coat should be slightly raised above the surrounding leather surface to allow for sanding.
• Allow to dry, ensuring each layer is completely dry before proceeding. Wet filler will be “ripped” during sanding, undoing all the work.
Cleaning and treatment of stubborn stains
This is a very patient treatment method, and the surrounding leather should not be damaged during the treatment.

Strategies for Different Types of Stains
Before treatment, you need to clearly know the type of stains and the different treatment methods for different types of stains to avoid damaging the leather. We will share them with you in several categories.
Removal of oily and fatty stains
These stains penetrate deep into the leather’s fibers, requiring you to absorb the oil rather than simply scrubbing it off.
• Powder absorption: You can use cornstarch, baking soda, or talcum powder.
• Quickly absorb excess surface oil with a paper towel. Sprinkle a thick layer of powder over the stain, completely covering it. Let it sit for several hours. The powder’s porous structure will act like a sponge, slowly drawing out the oil from deep within the leather. Finally, scrub the powder off with a soft brush and observe the results. If the stain persists, repeat the above process or use another method.
The Challenge of Ballpoint Pen Marks and Ink Stains
This is one of the most difficult stains to treat. We recommend that you buy a leather-specific ink remover. They are more effective and less damaging to the leather. They are usually in pen or gel form and can act on the stain more accurately.
Treatment of water stains and mildew
This is one of the most difficult stains to treat. We recommend that you buy a leather-specific ink remover. They are more effective and less damaging to the leather. They are usually in pen or gel form and can act on the stain more accurately.
Treatment of water stains and mildew
The logic: The edge of a water stain is noticeable because the localized moisture disrupts the distribution of oils and dye in the leather. The solution isn’t to “erase” the stain, but to evenly moisten it to eliminate the “edge.”
• Materials: Clean sponge, distilled water
• Using a slightly damp (no wrung-out) sponge, start at the center of the stain and gently rub in circular motions outward.
• Gradually wet the surface until the entire leather panel is covered (for example, the entire side of a bag or the entire seat of a sofa, bordered by the seams).
• The goal is to achieve an even darkening of the color across the entire panel, eliminating a noticeable “water stain edge.”
• Allow the leather to air dry naturally and slowly in a cool, well-ventilated area. Avoid direct sunlight or heat.
• Once completely dry, the water stain will usually disappear or become much less noticeable.
Using Professional Leather Cleaning Products and Techniques
The core of professional cleaning is treating leather like skin, requiring systematic care, rather than just another surface. Household cleaners (dishwashing liquid, glass water, all-purpose cleaners) are a complete no-no, as their pH, solvents, and chemical content can damage the leather’s protective layer and drain the natural oils it relies on.
1. Have a Professional Toolbox
A. Professional Cleaning Products (The Cleaners)
a) Mild Leather Cleaner:
• Form: Typically a liquid spray or water-based solution.
• Uses: For daily cleaning, regular care, and light stain treatment. This is a workhorse in your toolbox.
• Features: Neutral pH and a mild formula that removes surface stains without damaging the leather’s coating.
b) Strong/Foaming Leather Cleaner:
• Form: Typically a foaming solution or a concentrated solution that requires water to create a foam. • Uses: Treats heavily neglected leather with age-old stains (such as used car seats and old furniture), or deep cleans before refinishing.
• Features: Enhanced cleaning power, with foam that effectively lifts dirt from the deep grain of the leather, making it easier to remove.
c) Saddle Soap:
• Form: Classic, hard paste.
• Description: This is a traditional, very strong cleaning and maintenance product containing detergents and oils/waxes. While effective, it is not recommended for modern, delicate furniture or handbag leather. It is more suitable for durable leather such as saddles and boots. Improper use can darken the leather and clog its pores.
B. Professional Cleaning Tools
Horsehair Brush:
• A must-have tool! It’s even more important than the cleaner itself.
• Why: Horsehair has just the right consistency—hard enough to penetrate the leather’s pores and grain to dislodge dirt, yet soft enough not to scratch the surface. • Recommendation: Prepare two: one for cleaning (which can get dirty) and one for polishing.
Microfiber Cloths:
• Essential! Prepare at least three.
• Why: Highly absorbent, soft, and lint-free.
• Uses: One for wiping away foam and dirt after cleaning, one for drying, and one for applying and polishing care products.
Applicator Pad:
• For evenly applying leather care oil or protectant after cleaning.
2. Professional Cleaning Techniques
Step 1: Dry Preparation
Before applying any liquids, perform a dry cleaning.
• Dry Brushing: Use a horsehair brush to thoroughly and carefully brush every nook and cranny of the leather.
• Purpose: Removes all surface dust, grit, and debris. If this step is skipped, subsequent wet cleaning can turn these particles into “abrasive mortar,” causing microscopic scratches in the leather. Step 2: Wet Cleaning
• Testing: Test your cleaner on a hidden area to ensure it won’t cause discoloration or any other adverse reactions.
• Applying the Cleaner Correctly: This is the difference between a professional and a not-so-professional—never spray the cleaner directly onto the leather! This will oversaturate the area and leave watermarks.
• The Right Method: Spray the cleaner onto a horsehair brush or pour it onto a damp microfiber cloth.
• Agitate and Lather: Using a horsehair brush with the cleaner, scrub the leather surface in gentle, overlapping, circular motions. You’ll see a fine lather form. This lather entraps and “suspends” dirt deep within the leather’s grain.
• Zone Treatment: Divide the leather surface into several small areas (e.g., a seat cushion, a backrest) and clean each area individually to ensure even treatment and prevent the cleaner from drying out. Step 3: Wiping & Drying
• Dirt Removal: Use a clean, slightly damp microfiber cloth to wipe away any foam and dislodged dirt.
• Blotting: Immediately use another completely dry microfiber cloth, gently pressing and wiping the cleaned area to remove any remaining moisture.
• Air Drying: Allow the leather to air dry in a cool, well-ventilated area. Do not use a heat generator or direct sunlight.
• Step 4: Conditioning & Protecting
This is an essential step. The cleaning process strips the leather of some of its natural oils, which must be replenished promptly to prevent it from becoming dry and stiff.
• Confirming Dryness: Ensure the leather is completely dry from the cleaning process (usually 1-2 hours).
• Apply Evenly: Apply a small amount of high-quality leather conditioner/oil to a sponge or clean cloth. • Thin Layer Conditioning: Apply a thin, even layer to the leather surface using circular motions. Don’t overdo it; leather can only absorb so much.
• Let the Conditioner Absorb: Allow the conditioner to sit on the leather surface for a period of time (usually 30 minutes to several hours, depending on the product instructions) to fully penetrate.
• Final Polishing: Use a new, clean microfiber cloth or a specialized horsehair buffing brush to quickly and gently buff the leather surface. This will remove excess conditioner and restore the leather’s natural, radiant shine.
After completing this process, your leather will not only be as clean as new, but more importantly, its health and flexibility will be preserved and enhanced.
Color Restoration for Faded and Discolored Leather
Repairing faded and discolored leather is not as simple as just painting. It requires professional polishing and color matching technology to restore the original luster and color of leather products. It is more like a reshaping process, rebuilding a new, colored, flexible coating on the original damaged coating of the leather.

Surface preparation before repair: degreasing and light sanding
Before repairing, cleaning and oiling are necessary. Any professional repairer will tell you that 90% of repair failures (such as peeling or flaking of the color layer) are due to inadequate handling in this step.
Step 1: Degreasing
1. Why is degreasing necessary?
During use, leather inevitably absorbs various oily contaminants. These oils are the number one enemy of a new finish:
• Human oils: Oils secreted by skin and hair accumulate in high-contact areas such as armrests, headrests, steering wheels, and belts.
• Care product residue: Cheap, improperly made care products containing silicone or wax can form a barrier film on the leather surface.
• Environmental oils: Such as kitchen fumes and cosmetics.
These oils can severely hinder the adhesion of subsequent fillers and color coats. Just as you can’t stick tape to a greasy dish, no repair material will bond securely to a greasy leather surface.
2. When is degreasing necessary?
• Degreasing is essential before any filling or coloring work. • For heavily oiled areas (such as those on sofa headrests that have darkened and become shiny black), degreasing is the most critical step in the restoration process.
3. How to Perform Professionally?
Degreasing is a more intensive treatment, following the “deep cleaning” we discussed earlier.
a) Product Selection:
• Professional Leather Degreaser (Leather Prep): This is the best choice, formulated specifically for leather to effectively remove oil without causing excessive damage.
• Isopropyl Alcohol: 75% rubbing alcohol is an effective alternative, but should be used with caution as it is highly volatile and may remove more of the original color.
b) Procedure:
1. • Despeje o desengordurante ou álcool em um pano limpo, branco e sem fiapos (nunca diretamente no couro).
2. • Aplique pressão moderada na área alvo, de forma rápida e uniforme. Você pode ver alguma sujeira e cor sendo removidas no pano — isso é normal, pois está removendo o acabamento antigo e instável que foi contaminado pelo óleo. • Continue a mudar para o lado limpo do pano até que nenhuma transferência de cor ou sujeira seja perceptível.
3. • Sinais de Conclusão: A área tratada perderá temporariamente seu brilho, desenvolvendo uma aparência fosca, ligeiramente áspera, e até mesmo parecerá “chiar” ao toque. Isso indica que a barreira de óleo foi removida com sucesso.
4. • Deixe o solvente evaporar completamente (geralmente em poucos minutos).
5. Parte 2: Lixamento Leve
6. 1. Por que Lixar?
7. O desengorduramento aborda o problema da “adesão química”, enquanto o lixamento aborda a “adesão física”.
8. • Aumentar a Área da Superfície: Em um nível microscópico, o lixamento cria inúmeras pequenas ranhuras, picos e vales na superfície lisa do couro, aumentando significativamente a área da superfície.
9. • Criar um “Travamento Mecânico”: O preenchimento e a cor subsequentes podem penetrar nessas pequenas ranhuras. Uma vez secos e curados, eles agem como inúmeros pequenos ganchos, formando um “travamento mecânico” seguro com a superfície do couro.
10. • Suavizar Transições: Pode ser usado para suavizar as bordas do preenchimento, misturando-o perfeitamente com o couro circundante e eliminando qualquer irregularidade.
11. 2. Quando o lixamento é necessário?
12. • Após o preenchimento, antes da coloração: Esta é a aplicação mais comum. É usado para suavizar o preenchimento seco.
13. • Após o desengorduramento, antes da coloração: Para alguns couros muito lisos e densos (como Nappa), um lixamento geral muito leve após o desengorduramento pode quebrar o revestimento liso original e melhorar significativamente a adesão da nova camada de cor.
14. 3. Como fazer isso profissionalmente?
15. A palavra-chave aqui é “leve”. O objetivo é criar rugosidade microscópica, não arranhões visíveis.
16. a) Seleção de Ferramentas:
17. • Lixa de alta granulação: Isso é absolutamente crucial. Use lixa ultrafina na faixa de 800-1500 grãos. Para trabalhos particularmente delicados, até 2000 grãos podem ser usados. Nunca use lixa de baixa granulação e grossa!
18. • Almofada de Lixa: Envolver a lixa em uma pequena almofada macia garante uma pressão de lixamento uniforme.
19. b) Técnica:
20. • Pressão: Aplique pressão leve, suave como uma pena. Pense em si mesmo como “empossando” em vez de “lixando”.
21. • Método: Use movimentos circulares ou retos suaves.
22. • Objetivo: Simplesmente “empossar” o brilho da superfície do couro. Você está buscando um acabamento uniforme e fosco que seja suave ao toque.
23. • Limpeza: Após o lixamento, é crucial remover completamente todo o pó de lixa com um pano limpo ou um levemente umedecido com álcool. Qualquer pó restante aparecerá como uma imperfeição sob o novo revestimento.
24. Após concluir as etapas de desengorduramento e lixamento leve, você terá uma base de nível profissional ideal para qualquer produto de restauração. Este é o caminho para uma restauração “impecável” e uma das diferenças mais significativas entre a restauração amadora e profissional.
25. Como escolher e misturar as cores certas
26. Parte 1: Escolhendo o Pigmento Certo. Escolher o pigmento errado pode levar ao fracasso, mesmo com a cor certa.
27. 1. Tipo de Produto: Pasta de Cor de Poliuretano (PU) à Base de Água
28. • Escolha Obrigatória: Os produtos profissionais de restauração de couro no mercado são quase todos baseados em uma resina de poliuretano à base de água. Isso garante que o revestimento reparado possua as seguintes propriedades-chave:
29. • Flexibilidade: Capaz de flexionar e esticar com o couro sem rachar.
30. • Durabilidade: Resiste ao atrito do uso diário.
31. • Adesão: Adere firmemente a superfícies de couro devidamente preparadas.
32. • Segurança: Fórmulas à base de água oferecem baixo odor e são mais seguras e ecologicamente corretas do que produtos à base de solvente.
33. Evite Absolutamente: Tintas acrílicas padrão de artista, tintas a óleo e tintas para modelos. Esses produtos tornam-se rígidos e quebradiços após a secagem e podem rachar e descascar rapidamente no couro.
34. 2. Forma do Produto: Kits vs. Cores Pré-misturadas
35. • Kits de Restauração (Recomendado): Geralmente incluem cinco cores base: preto, branco, vermelho, amarelo e azul, bem como cores comuns como marrom e ocre, e ajustadores de brilho.
36. Prós: Permite misturar teoricamente qualquer cor, oferecendo a maior flexibilidade e tornando esta a única opção para restauração profissional.
37. Contras: Requer um certo nível de teoria das cores e paciência.
38. • Cores Pré-misturadas: Cores pré-misturadas para marcas específicas (como certas cores de assentos de carro).
39. Prós: Prontas para usar direto da caixa, muito convenientes.
40. Contras: Mesmo as cores “originais” não podem garantir uma correspondência exata com o seu couro, que desbotou ao longo dos anos. A cor do couro pode mudar de forma única devido à exposição solar, uso e outros fatores.
41. Parte 2: Misturando a Cor Certa
42. 1. Desconstruindo a Cor
43. • Examine cuidadosamente sua “paleta de cores alvo” e analise seus componentes de cor primários.
44. • Por exemplo, uma cor “marrom” típica pode ser composta por uma quantidade significativa de branco, ocre, uma pequena quantidade de vermelho e uma quantidade mínima de preto. Uma cor “off-white” pode ser 98% branca, com um toque de amarelo e um toque de ocre.
45. 2. Comece Claro, Adicione Escuro (Start Light, Add Dark)
46. • Em sua paleta ou em um pequeno recipiente, sempre comece com a cor mais clara e mais generosa. Para a maioria das cores, isso significa começar com branco.
47. • Em seguida, usando um conta-gotas ou palito, adicione as outras cores gota a gota. Mexa bem a cada gota.
48. • Chave: Escurecer uma cor é fácil, mas clarear uma cor já escura requer adicionar muito branco, o que é um desperdício e difícil de controlar.
49. 3. Testar e Secar (Amostra)
50. • Quando você achar que a cor “parece certa”, use uma pequena espátula ou cotonete para aplicar uma pequena quantidade da cor misturada em uma área escondida e discreta do item de couro (ou um pedaço de papel branco ao lado da sua cor alvo).
51. • Seque imediatamente esta pequena amostra com um secador de cabelo em temperatura baixa!
52. • Compare a amostra seca com sua “paleta de cores alvo”.
53. 4. Analisar e Ajustar
54. • Muito claro? Que cor está faltando? Não está escuro o suficiente no geral (adicione um pouco de preto ou sua cor complementar) ou não está vermelho o suficiente (adicione um pouco de vermelho)?
55. • Muito escuro? Isso é complicado; você precisará pegar uma quantidade maior da cor base clara e misturar uma pequena quantidade da cor que você acabou de escurecer.
56. • Tonalidade errada? Por exemplo, se você está buscando um marrom quente, mas ele sai mais frio (esverdeado), adicione uma pequena quantidade de vermelho ou ocre para aquecê-lo. Se estiver muito avermelhado, adicione uma pequena quantidade de verde (cor complementar do vermelho) para neutralizá-lo.
57. 5.
• Repeat the cycle of “Adjust → Stir → Test → Dry → Compare” until you’re satisfied with the color match after drying. This process may take 5 to 10 cycles or more; patience is the key.
Techniques for even color application: sponge, airbrush, or brush?
It directly impacts the aesthetic success of a restoration. Even the most perfectly blended colors can be ruined by the wrong application tools and techniques. Choosing a sponge, airbrush, or brush depends on the area of your restoration, the desired effect, and the equipment available. Below, we’ll provide a detailed comparison and analysis of these three tools.
1. Sponge – Versatile, Easy to Use, Natural-Looking Results
Sponges are the most commonly used and reliable hand-applying tool in professional restoration, especially suitable for DIY enthusiasts and most restoration scenarios.
• Applications:
Almost all applications, from covering small scratches to extensive color changes.
Particularly suitable for leathers with natural grain, such as pebbled and tumbled leather.
• Advantages:
Easy to control: You can precisely control the amount of paint applied and where it’s applied.
Avoid brush marks: Applying paint by dabbing, rather than wiping, completely eliminates the problem of brush marks. Simulating Grain: The pressing motion creates a natural, slightly bumpy, dotted texture that mimics the leather’s natural pores and grain, making the repaired area blend more easily into the surrounding area.
Cost-Effective: Sponges are inexpensive and readily available.
• Disadvantages:
Low Efficiency: For very large areas (such as an entire sofa), applying color by hand through pressing can be very time-consuming.
Uniformity Limits: While the effect is natural, achieving the absolutely smooth, mirror-like finish of an airbrush is difficult.
• Pro Tips:
“Dry” Sponge, “Wet” Material: Using a slightly damp sponge (wrung out all the water) allows the color to be applied more evenly, rather than being absorbed all at once by the dry sponge.
“Dip-Press-Lift”: After applying a small amount of color, press it onto cardboard to remove any excess paint. Then, press the leather in gentle, vertical, and quick strokes, lifting distinctly with each stroke to avoid dragging. Edge Feathering: When applying a localized repair around the edges, apply gentle pressure to create a natural, pixelated transition (gradient) between the new and old colors, rather than a harsh line.
Multiple, Thin Coatings: Always apply multiple, thin coats, thoroughly drying with a hairdryer between each coat.
2. Airbrush – Extremely Even, Highly Efficient, and the Professional Choice
The airbrush is the ultimate tool for achieving “factory-quality” restoration results. It uses compressed air to atomize the color into extremely fine particles, applying them evenly to the leather surface.
• Suitable Applications:
Large-area color restorations and full-scale color changes (such as entire car seats, sofas, and leather garments).
High-end restorations that strive for an extremely smooth, smudge-free finish.
Repairing subtle color transitions or “gradients.”
• Advantages:
Absolutely Even: Creates the smoothest, most even coat of color, without any contact marks.
Extremely Thin Coatings: Applying a very thin coat maximizes the preservation of the leather’s fine grain. Highly Efficient: For large areas, it’s significantly faster than any other hand-painting method.
Easy Transitions: Soft color transitions and feathering effects can be easily achieved.
• Disadvantages:
Equipment Required: Requires a complete set of equipment, including a spray gun and air pump (compressor), resulting in a high initial investment.
Technique Required: Mastering the right combination of spray distance, air pressure, and paint output to avoid runny, overspray, and orange peel is challenging.
Preparation Required: Masking tape and film are required to carefully protect all areas not to be sprayed (such as seams and hardware), which is very time-consuming.
• Pro Tips:
Filtering Pigments: Always filter the mixed color through a strainer before use to prevent any small particles from clogging the spray gun.
“Wet Spraying” Technique: Maintain a suitable distance (usually 15-20 cm) and move the spray gun at a steady speed, ensuring that each subsequent spray covers 1/3 to 1/2 of the edge of the previous spray, creating a continuous, wet coat. Corners first, then back: Spray hard-to-reach corners like seams and folds first, then spray flat, large surfaces.
3. Brush – For fine detailing only
A brush is a very specialized tool for leather color restoration and should never be used for large areas.
• Applications:
Repairing color wear along seam edges.
Adding color to carved leather sculptures.
Instrumenting fine patterns or repairing small, point-shaped damage that is difficult to reach with a sponge.
• Advantages:
Ultimate precision: Allows precise color control over even the smallest details.
• Disadvantages:
Prone to brush marks: Use on any flat surface will leave noticeable, unnatural brush marks.
• Pro Tip:
Choose a soft brush: Use a high-quality, soft-bristled watercolor or modeling brush.
Follow the grain: If you must apply to a textured surface, apply in the direction of the leather’s grain.
Diluting paint: Dilute the paint appropriately to minimize the visibility of brush marks.
Color fixing and gloss treatment: lock in perfect color
If you compare the previous steps of cleaning, filling, and painting to the sheet metal and paint job of a classic car, then this final step is the application of a crystal-clear, indestructible layer of clear coat. It not only determines the final gloss and texture, but also acts as a protective shield for all your hard work, ensuring the restoration remains pristine for years to come.
Part 1: Why is this an essential final step?
This step fulfills two core missions: functionally protecting the color and aesthetically restoring the finish.
A. Color Fixing & Protection
Although the water-based color layer we applied previously is flexible and adheres well, its inherent resistance to abrasion, stains, and water is limited. A high-quality clear topcoat (sealer) provides crucial protection:
• Abrasion resistance: It forms a tough physical barrier that resists the friction of daily use, preventing the color from being easily scratched or rubbed onto clothing. • Stain Resistant: It seals the micropores of the color layer, effectively resisting the penetration of water, oil, and other stains.
• Fade Resistant: Many professional topcoats contain UV inhibitors, which slow down the fading of the color caused by sunlight.
• Uniform Touch: It provides a smooth, natural leather feel, not a “painted” feel.
Simply put, without this step, your color repair is just a fragile “temporary makeup”; with this step, it becomes a durable “permanent tattoo.”
B. Gloss Treatment & Restoration
This is the art of determining whether the repair is “invisible.” Natural leather has a unique sheen, ranging from a completely matte finish to a shiny gloss.
• Matching is key: If your sofa has a matte finish, but the repaired area has a glossy finish, the “patch” will be very noticeable, even if the color is accurate. • Gloss Options: Professional finish products typically offer a variety of gloss options:
• Matte: Completely non-reflective, suitable for many modern furniture, car interiors, and bags.
• Satin/Semi-gloss: The most common gloss, with a subtle, warm, natural sheen.
• Gloss: Highly reflective, often seen on patent leather or certain styles of leather goods.
Your goal isn’t to “brighten” the leather, but to achieve a 100% match between the gloss of the repaired area and the original gloss of the surrounding undamaged area.
Part 2: How to Do It Professionally
1. Preparation
• Dry Thoroughly: Ensure the final coat of color is completely and thoroughly dry. Ideally, wait at least 4-6 hours, or even overnight. Applying finish over wet color can cause the color to bleed, with disastrous results.
• Clean the Surface: Gently wipe the surface with a clean, dry cloth to ensure the painted surface is free of any dust particles. 2. Product Selection and Application
• Product: Choose a water-based leather finish that matches the brand of color you’re using to ensure optimal chemical compatibility.
• Tools: A clean sponge, spray gun, or high-density foam brush.
Application Tips (using a sponge as an example):
• Thin coats are king: As with paint, applying multiple, thin coats is far more effective than a single, thick coat. Aim for two to three thin, even coats.
• Stroke-wise application: Pour a small amount of finish onto a slightly damp sponge. Unlike the “pressing” motion used when applying paint, apply finish using a smooth, unidirectional “wiping” motion. For example, from left to right or from top to bottom, each coat slightly overlaps the edge of the previous one. This minimizes smearing and creates the smoothest possible finish.
• Dry between coats: Immediately dry each coat with a hair dryer on low or cool air. Once it feels tacky to the touch, apply the next coat.
3. Final Curing: The Most Important Wait
This is the most easily overlooked, yet crucial, point.
• The Difference Between “Drying” and “Curing”:
• Dry to Touch: This refers to the evaporation of moisture from the coating, leaving the surface tack-free. This process is quick, taking only a few minutes with the help of a hair dryer.
• Cured: This refers to the complete chemical cross-linking within the coating, achieving its designed final hardness, abrasion resistance, and chemical resistance. This process is much longer.
• Curing Time: Depending on the product and the ambient temperature and humidity, a full cure typically takes between 24 hours and 7 days.
• Precautions During This Period: Before the repaired leather is fully cured, while it can be used, its protective layer is still fragile. Avoid:
• Scratching with fingernails.
• Deep cleaning or the use of any chemicals.
• Prolonged heavy pressure or severe friction.
Once you have patiently waited for the curing period to complete, your leather repair is officially complete. Not only do you restore its appearance, you also give it a strong layer of protection, so that this perfect color can be locked in for a long time
Restoration Considerations for Special Leather Goods
For different types of repair considerations, we need to first identify the type of leather. In special leathers, especially expensive luxury goods, if the treatment is wrong, the damage will be permanent. If you are not sure, it is recommended to consult a professional leather care technician.
Leather coats and jackets: focus on softness and mobility
Extremely high flexibility is the best requirement for leather jackets and leather pants. Leather jackets are worn on the body and need to bend, stretch and fold continuously and over a large range with the body. The collar and cuffs are the places that are most touched by body oil, which will absorb a large amount of secreted oil, causing the color to darken and the leather to harden. In addition, the environment also affects the leather. In the case of high temperature, sun, rain and extremely low temperature, the leather jacket will bend, stretch and fold continuously and over a large range with the body.
Restoration Product Priorities
Flexibility is the top priority: All restoration products selected, from fillers and color correctors to the final finish, must be highly flexible.
Degreasing Key Areas: When repairing collars and cuffs, thorough degreasing is the first step that determines success. Use a professional degreaser and repeatedly wipe until a clean, matte finish is achieved.
Topcoat Selection: A semi-gloss or matte finish is typically chosen to complement the natural texture of the leather. The finish should also be resistant to abrasion.
Regular Maintenance: Leather’s life depends on its maintenance. Even if it’s not damaged, it should be cleaned and oiled seasonally to maintain the fiber’s flexibility and prevent cracking.
Professional Tip: After the repair is completed, hang the leather on a wide hanger in a well-ventilated area to allow the repair material to fully cure without tension for at least 48-72 hours. This is crucial for achieving ultimate flexibility.
Leather sofas and furniture: Consider wear resistance and daily use
Key considerations for common problems:
High durability and abrasion resistance, requiring it to withstand prolonged sitting pressure, friction, and threats from keys, cat claws, and sharp objects.
Large-scale visual uniformity: The sofa is the centerpiece of the living room, and any local variations in color or gloss are highly noticeable.
Complex sources of contamination: Food, beverages, human and pet oils, and pen marks.
Ultraviolet radiation: Areas near windows can fade and age due to prolonged sun exposure.
Cracks, collapse, and severe fading in the seat and backrest due to prolonged pressure.
Darkening and stickiness in the armrests and headrests due to body oils.
Scratches and stains from pets.
Overall color dulling and unevenness due to age.
Restoration strategies and product selection:
Durability is the top priority: The choice of finish is crucial; a professional, abrasion-resistant, and scratch-resistant furniture leather finish is essential.
Precision in color matching: Extreme precision is required when matching colors. After restoration, the color difference between the new and old areas should be discernible under both natural and outdoor lighting.
Repair on a “surface-by-surface” basis: To avoid color discrepancies, even with minor damage, it’s recommended to clean and paint the entire panel (demarcated by the seams). Severely faded sofas often require a complete restoration.
Filling and Graining: Deep cracks and scratches require careful sanding after filling, and the paint should be applied using a sponge or specialized tools to reshape the grain to match the surrounding leather grain.
Pro Tip: Before any color restoration, confirm the adjusted color using the lighting (natural or outdoor) where the sofa will be placed.
Car leather seats: resistant to sunlight and temperature changes
Common Issues and Key Considerations:
Harshest Operating Environment: Subject to extreme temperature fluctuations (indoor car interiors can reach 70-80°C in the hot summer sun and freezing cold in the winter), strong direct UV rays, and high levels of daily wear and tear (especially on the driver’s side).
Industrial-grade durability standards: Car leather coatings are typically thicker and tougher than furniture leather.
Safety considerations: Repair materials must be flame retardant and must not produce harmful gases.
Specific gloss requirements: Almost all modern car seats have a matte or very low-gloss finish to reduce glare and reflections during driving.
Repair Strategy and Product Selection:
Abrasion resistance and UV protection are top priorities: Use repair products specifically formulated for car leather. Topcoats, in particular, must be clearly labeled as **high abrasion resistance and UV protection**.
Strict degreasing: Car seats, especially the driver’s seat, accumulate significant amounts of oil and sweat, requiring thorough, professional degreasing before repair.
Gloss matching is crucial: A matte topcoat must be selected. Any excess gloss will make the repair look cheap and unprofessional.
Color transfer treatment: For denim dyeing, clean the area with a specialized color transfer remover before considering recoloring.
Pro Tip: For severe wear on the side panels, consider applying one or two more coats of a high-abrasion finish than other areas. Be sure to avoid heavy abrasion on the area for at least 3-7 days after the repair to allow it to fully cure.
Luxury leather bags: meticulous restoration and value preservation
Common Problems and Key Considerations:
Value and Aesthetics: The core of restoration is to **preserve value** and **restore beauty**, requiring the highest level of precision and restoration.
Material Diversity: Delicate and exotic leathers such as aniline, calfskin, sheepskin, and even exotic leathers are often used.
Detailed Hardware and Stitching: All non-leather parts must be perfectly avoided and protected during restoration.
“Less is More”: Excellent luxury bag restoration strives for minimal intervention to maximize the preservation of the original texture and charm.
Wear and fading on the four bottom corners.
Darkening, blackening, and cracking of the handles due to sweat and oil.
Scratches on the front of the bag from fingernails or hard objects.
Deformation or indentations caused by improper storage.
Stains from handwriting or cosmetics on the lining.
Restoration Strategy and Product Selection:
Precision is the top priority: Color matching must be 100% accurate. Filling and polishing must be extremely smooth. Perfect Hardware Protection: Before painting, meticulously protect every piece of hardware, zipper, and logo with specialized masking tape and fluid.
Prioritize Special Leather Treatments: First, determine the bag’s leather type. If it’s aniline, waxed, or similar, standard procedures must be abandoned in favor of the specialized leather repair strategies discussed previously.
Special Handle Treatment: Restoring handles typically requires a deep degreasing process followed by a color refinish and multiple coats to protect against future oil damage.
Pro Tip: Never attempt a “total restoration” on a luxury bag to make it look “new” unless it’s a solid color and severely damaged. The best restoration is one that eliminates the damage while preserving the bag’s timeless, original charm.
Key points for repairing artificial leather (PU/PVC)
Before repairing faux leather, it’s important to understand that faux leather is not the same as genuine leather. It’s not like treating real skin, but rather a thin coating attached to a base fabric. Before repairing, forget about “nourishing” and focus on “surface engineering.” Remember the golden rules of repair:
Rule 1: Avoid oil-based care products. This is crucial and the most common mistake. Using any leather care oil, mink oil, or lanolin on faux leather will completely block the product, rendering it ineffective and potentially damaging.
Rule 2: Cleaning isn’t about absorption; it’s about removing all contaminants that could hinder the adhesion of subsequent glues, fillers, and color coatings, creating an absolutely clean base for repair. Therefore, choose a pH-neutral cleaner or a dedicated vinyl/plastic cleaner.
Rule 3: Bonding + Filling = Repairing Structural Damage: Use backing, specialized glue, and flexible fillers.
Rule 4: Embossing is key to invisible repairs.
Rule 5: Color repair is like painting, not dyeing.
Regra 6: Mantenha uma atitude positiva em relação a rachaduras e descascamento.
A diferença entre o reparo de couro artificial e couro genuíno
A diferença entre o reparo de couro artificial e couro genuíno não é o método, mas a natureza dos materiais.
O conceito central de reparo de couro artificial vs. couro genuíno:
Ao reparar couro genuíno, você age como um "dermatologista", diagnosticando e restaurando a saúde e vitalidade de um material biológico natural.
Ao reparar couro artificial, você age como um "engenheiro de materiais poliméricos", reconstruindo e embelezando uma superfície plástica industrial danificada.
| Fase de reparo | Couro Genuíno | Couro artificial (PU/PVC) |
|---|---|---|
| Essência do Material | A pele animal, composta por fibras de colágeno porosas, é "viva". | A camada plástica (poliuretano/policloreto de vinila) é laminada à base de tecido e é um produto industrial "morto". |
| Conceito central de restauração | De dentro para fora: Nutre e restaura a flexibilidade da fibra antes de tratar a superfície. | De fora para dentro: Trata apenas a superfície, cobrindo os danos com colagem, preenchimento e pintura. |
| Modo de envelhecimento/dano | A perda de óleos internos faz com que as fibras sequem, endureçam e rachem. | A volatilização dos plastificantes faz com que a camada plástica se torne quebradiça, rache e se solte/descasque da base de tecido. |
| Propósito da limpeza | Remove impurezas e abre os poros para prepará-los para a absorção de óleos de tratamento. | Remove a sujeira e cria uma base 100% limpa para garantir que a cola e a tinta adiram firmemente. |
| Óleo de cuidado/produtos nutritivos | Necessidades. São o "alimento" e o "remédio" que restauram sua vitalidade e flexibilidade. | Absolutamente não. Não pode ser absorvido e apenas flutuará na superfície, tornando-se oleoso, atraindo poeira e podendo até danificar a camada plástica. |
| Preenchedor | Massa de Couro/Pasta de Preenchimento: Projetada para preencher lacunas entre as fibras e ligar-se às fibras do couro. | Vinil/Pasta de Preenchimento Flexível: Projetada para criar um revestimento novo, liso e flexível em uma superfície plástica não porosa. |
| Restauração da Cor | É uma combinação de "coloração" e "micro-tingimento", e a cor pode ser integrada à parte da fibra superficial do couro. | Pura **"pintura/revestimento de superfície"**, a cor é completamente coberta sobre a camada plástica. |
| Principais tecnologias de reparo | Oleamento/engorduramento profundo para suavizar a superfície: Esta é a chave para restaurar sua saúde e resolver a causa raiz das rachaduras. | Retexturização/Embossado: Este é o cerne de fazer a área de reparo lisa se misturar com a textura em relevo circundante e alcançar a "invisibilidade". |
| Manutenção após a restauração | O uso regular de óleo de cuidado é necessário para nutrição contínua para manter sua condição. | Usar um protetor de vinil/plástico essencialmente mantém uma película protetora limpa sem a necessidade de "nutrição". |
| O objetivo fundamental da restauração | Rejuvenescer: Permite que o couro recupere sua saúde e aceite seus sinais naturais de envelhecimento (Pátina). | Ocultar: Cobrir e embelezar a aparência de danos de envelhecimento irreversíveis, o que é controle de danos. |
Métodos eficazes para lidar com o descascamento e danos do couro artificial
O descascamento do couro artificial é o resultado final do envelhecimento e da perda de plastificante, levando à fragilidade. Portanto, nosso reparo não é uma "cura", mas um "disfarce". Nosso objetivo é cobrir visualmente os danos, evitar uma maior expansão e restaurar a funcionalidade através de uma série de tratamentos de superfície meticulosos.
Passo 1: Avaliação e Desbridamento
Antes de começar, determine se o reparo é viável.
Descascamento pequeno e localizado: Isso é ideal para reparo.
Descascamento e esfarelamento grandes e persistentes: Isso indica o fim da vida útil de todo o material, tornando os reparos menos eficazes porque novos danos se desenvolverão rapidamente perto da área reparada.
Procedimento:
O desbridamento é fundamental: Use pinças e pequenas tesouras para limpar todas as bordas levantadas, soltas e descascando. Trabalhe até que as bordas estejam firmes e não descasquem facilmente. Tentar colar fragmentos de couro soltos de volta é inútil.
Limpeza e Desengorduramento: Use um detergente suave ou álcool diluído para limpar completamente a área danificada e as áreas circundantes para remover sujeira e gordura, proporcionando uma superfície limpa para a subsequente fixação do material.
Passo 2: Estabilização das Bordas
Este é um passo crítico para evitar que o dano se expanda.
Aplicação de Cola: Use um palito de dente ou a ponta de uma agulha para aplicar uma pequena quantidade de adesivo flexível especializado para vinil/plástico.
Colagem Fina: Aplique cuidadosamente o adesivo logo abaixo da borda estabilizada, entre a camada plástica e o suporte de tecido.
Pressione para Colar: Pressione a borda firmemente para colá-la novamente ao suporte de tecido subjacente. Use grampos ou um objeto pesado para mantê-la pressionada e deixe a cola secar completamente. Agora você tem uma "borda de reparo" segura.
Passo 3: Preenchimento e Nivelamento
Agora precisamos preencher a "depressão" criada pelo descascamento.
Escolha o Preenchedor: Use Composto de Reparo de Vinil Flexível. Ele permanece flexível após a secagem e é compatível com superfícies de PU/PVC. Preenchimento em camadas: Usando uma pequena espátula flexível, aplique uma pequena quantidade de pasta de preenchimento finamente na área danificada, preenchendo quaisquer depressões.
Seja paciente: Não aplique uma camada grossa de uma vez. Deixe a primeira camada secar completamente de acordo com as instruções do produto (use um secador de cabelo em baixa temperatura para acelerar o processo). Se restarem depressões, aplique uma segunda camada.
Nivelamento final: Após a última camada de preenchedor, a superfície deve estar nivelada com a superfície original do couro circundante, ou ligeiramente mais alta, para permitir o lixamento.
Passo 4: Lixamento
Este passo garante uma transição perfeita entre a área reparada e a superfície circundante.
Escolha a lixa: Use lixa fina com granulação de 600 a 1200.
Lixamento suave: Depois que a pasta de preenchimento estiver totalmente curada, lixe muito suavemente a superfície e as bordas da área reparada até que nenhuma costura ou protuberância seja sentida com o dedo.
Limpe a poeira: Limpe qualquer poeira de lixamento com um pano limpo.
Passo 5: Cor e Textura
Este é o toque final da restauração.
Cor: Use um corretor de cor à base de água para PU/vinil que corresponda à cor original do couro. Aplique a cor fina e em camadas com uma esponja, aplicando-a com uma esponja sensível à pressão. Seque com um secador de cabelo entre as camadas.
Retexturização (Dica Profissional): Quando a última camada de cor ainda estiver ligeiramente pegajosa e úmida, pegue uma folha de papel granulado (geralmente incluída no kit de restauração) e coloque-a sobre a área reparada. Pressione firmemente com a ponta de uma ferramenta ligeiramente aquecida ou com as pontas dos dedos para "copiar" a textura para a superfície reparada. Ao retirá-la, a área reparada anteriormente lisa terá uma textura que corresponde à área circundante, melhorando significativamente o efeito visual.
Passo 6: Selagem
Este é o passo final para garantir a longevidade da restauração.
Aplicação de um Topcoat: Depois que a camada de cor estiver completamente seca, aplique 2-3 camadas uniformes de selador/topcoat de vinil usando uma esponja limpa ou pistola de pulverização. Combinando o Brilho: Certifique-se de que o nível de brilho (fosco, semi-brilho ou brilhante) do acabamento selecionado corresponda ao couro original.
Cura Completa: Deixe o item reparado descansar por pelo menos 24 horas para permitir que todos os materiais curem completamente e atinjam a força e durabilidade ideais.
Limpeza e manutenção de couro artificial
Parte 1: Limpeza de Couro Artificial
A. Limpeza Diária (Frequente/Semanal)
Este é o passo mais simples e importante, evitando que poeira e detritos se acumulem e se tornem manchas teimosas e difíceis de remover.
Ferramentas: Pano seco e macio (microfibra é o melhor), escova de cerdas macias.
Método:
Use uma escova de cerdas macias para remover suavemente poeira e detritos da superfície e das fendas.
Limpe toda a superfície com um pano de microfibra seco.
Para manchas menores, limpe suavemente com um pano umedecido em água limpa (torça bem para remover qualquer água pingando).
B. Limpeza Profunda (Infrequente/Sazonal ou Conforme Necessário)
Quando a superfície do couro artificial estiver pegajosa, tiver manchas visíveis ou parecer opaca, uma limpeza profunda é necessária.
Escolha um Limpador:
Melhor Escolha: Adquira um limpador comercialmente disponível especificamente projetado para vinil ou couro PU. Uma opção DIY segura: Adicione algumas gotas de um detergente suave e com pH neutro (por exemplo, shampoo de bebê ou detergente de louça sem alvejante) a uma tigela de água morna e mexa até espumar.
Instruções:
Teste: Teste sua solução de limpeza em uma área discreta para garantir que não haja reações adversas.
Limpeza Úmida: Mergulhe um pano de microfibra na solução de limpeza e torça-o completamente até que esteja apenas úmido, não encharcado.
Limpeza por Zona: Limpe a superfície do couro sintético em pequenas áreas definidas com um pano úmido.
Tratamento de Manchas Teimosas: Para manchas profundas, use uma escova de dentes de cerdas macias para ensaboar a solução de limpeza e esfregue suavemente em movimentos circulares.
Remoção de Resíduos (Passo Crítico): Use um segundo pano bem torcido e umedecido com água limpa para reaplicar na área limpa. Este passo remove qualquer detergente restante e evita que ele forme uma película na superfície.
Seque Completamente: Limpe imediatamente toda a umidade com um terceiro pano macio e completamente seco; não deixe a mancha secar ao ar.
Parte 2: Manutenção de Couro Artificial
A manutenção do couro artificial não é sobre re-olear, mas sim sobre proteção.
A. Proteção Física (Essenciais Diários)
Evite a luz solar direta (Proteção UV):
Razão: Os raios UV são o principal assassino do couro artificial, acelerando o envelhecimento, a fragilidade e o desbotamento da camada plástica.
Ação: Para móveis, puxe as cortinas. Para assentos de carro, use para-sóis ao estacionar.
Evite calor direto (Proteção contra o Calor):
Razão: Altas temperaturas aceleram a volatilização dos plastificantes, endurecendo o couro artificial e potencialmente causando o derretimento e a deformação da superfície.
Ação: Evite colocar produtos de couro artificial perto de fontes de calor, como radiadores, lareiras e aquecedores.
Evite objetos pontiagudos (Proteção contra Arranhões):
Razão: Uma vez que o revestimento plástico do couro artificial é arranhado, é quase impossível repará-lo completamente.
Ação: Tenha cuidado com chaves, garras de animais de estimação, rebites em roupas, etc.
B. Proteção Química (Operação Regular)
Este passo é o mais próximo da "manutenção" e visa formar uma camada protetora na superfície. Seleção do Produto: Use um agente protetor/condicionador projetado para couro artificial, vinil ou plástico.
Benefícios do Produto:
Oferece proteção UV, como aplicar protetor solar no couro.
Forma um revestimento antiestático na superfície, reduzindo a atração de poeira.
Aumenta o deslizamento da superfície e reduz o atrito, ajudando a resistir a pequenas abrasões.
Torna as manchas mais difíceis de aderir, facilitando a limpeza futura.
Como Usar:
Aplique após a limpeza profunda e secagem completa.
Pulverize uma pequena quantidade de agente protetor em uma esponja limpa ou pano macio (não pulverize diretamente no couro).
Aplique uma camada fina e uniforme sobre toda a superfície.
Deixe secar naturalmente ou lustre levemente com um pano seco de acordo com as instruções do produto.
Frequência: Dependendo da intensidade de uso, uma aplicação típica é a cada três a seis meses.
Quando você deve desistir do DIY e procurar ajuda profissional?
- O item é excessivamente valioso: valor monetário/valor sentimental
- O couro é feito de um material único e delicado: couro anilina/camurça/couro exótico
- O dano é complexo e extenso
- O custo do reparo está além do seu orçamento
- Você não tem paciência e recursos para realizar o reparo
A área danificada é muito grande ou a localização é crítica
Danos extensos: O auto-reparo pode resultar em irregularidades visuais, má textura e descascamento generalizado. Recomendamos contratar um restaurador de couro profissional para uma renovação completa ou substituição parcial do couro. Danos em áreas críticas: O auto-reparo pode levar a uma força estrutural insuficiente, rápida deterioração da área reparada e falhas cosméticas perceptíveis. Recomenda-se reparo estrutural profissional ou substituição de peças especializadas.
Envolve danos estruturais (como colapso de cavernas)
Este é um dano estrutural interno. O couro pode estar intacto. Isso pode ir além do escopo do reparo de couro e entrar em um projeto de estofamento mais complexo. Recomenda-se procurar ajuda de um mestre de estofamento profissional com experiência.
Para itens valiosos ou comemorativos
Nossa filosofia de reparo para este tipo de produto de couro não é atuar como restaurador, mas como guardião. Nosso único propósito é não danificar o couro. Recomendamos procurar agências de avaliação profissional (serviço pós-venda oficial do local de compra do produto de couro) para perguntar sobre o material, o grau de dano e o processo de construção. Após determinar o dano mínimo, recomendamos se deve fazer você mesmo ou entregar a uma agência de reparo profissional.
Falta de confiança ou das ferramentas certas
Este é um problema que a maioria das pessoas encontra, e acredito que é solucionável. Construa confiança através da prática sem riscos e construa sua caixa de ferramentas através de investimento faseado.
1. Superando a Falta de Confiança
Encontrar itens de couro usados/antigos: Este é o melhor método, de custo zero/baixo custo. Você pode encontrar uma bolsa ou sapato de couro antigo como sua peça de teste e realizar reparos DIY nela sem nenhuma preocupação. Se quebrar, você pode até experimentar com outro item de couro antigo.
Comece com as práticas mais básicas e seguras: Pratique os procedimentos profissionais de limpeza e cuidado que discutimos anteriormente em sua peça de prática. Sinta a escova de crina de cavalo, observe como o limpador espuma e experimente as mudanças no couro antes e depois da absorção do óleo. Este processo não é apenas seguro, mas também permite que você desenvolva uma conexão próxima com o material. 2. Resolva o problema de não ter ferramentas: Você não precisa comprar todas as ferramentas de reparo de couro de uma vez, compre-as em etapas; Etapa 1: Caixa de ferramentas de limpeza e manutenção principal, lista de caixa de ferramentas de manutenção (um conjunto de limpador e óleo de cuidado de couro de alta qualidade, duas escovas de crina de cavalo, vários panos de fibra) e lista de caixa de ferramentas de reparo (um pequeno kit de couro, um pacote de lixa de alta granulação, uma garrafa de álcool medicinal, um secador de cabelo doméstico). Você pode começar com a Etapa 1
Serviços Profissionais de Restauração de Couro Revelados
Depois de discutir as complexidades da restauração DIY, vamos dar uma olhada nos bastidores de um estúdio profissional de restauração de couro para entender a diferença entre a restauração DIY e a profissional.
Parte 1: O Fluxo de Trabalho Padronizado (S.O.P.) da Restauração Profissional
Desde o momento em que um item é entregue a um restaurador profissional até seu estado perfeito, ele geralmente passa pelo seguinte processo rigoroso:
Passo 1: Recepção, Consulta Aprofundada e Divulgação de Riscos
• O que fazer: Os profissionais não simplesmente aceitarão o item e dirão: "Sem problemas." Eles farão perguntas, como um médico, sobre a marca, idade e condição do item. Como o dano ocorreu? Você já tentou algum produto de tratamento por conta própria? Você deseja uma restauração "como nova" ou "preservar seu charme"?
• O Segredo: Este passo é projetado para gerenciar expectativas e mitigar riscos. Através da comunicação, eles podem determinar suas verdadeiras necessidades e informá-lo antecipadamente sobre riscos potenciais (por exemplo, variações de cor devido a materiais especiais, ou fragilidade estrutural que impede a restauração completa). Um restaurador que ousa dizer "não" ou divulga riscos antecipadamente é geralmente considerado uma pessoa mais profissional. Passo 2: Diagnóstico e Plano Profissional
• O que fazer: Restauradores usam ferramentas especializadas (como lupa e colorímetro) e vasta experiência para diagnosticar com precisão o couro:
• Identificar com precisão o tipo de couro: É couro revestido? Couro anilina? Ou um tipo especial de couro oleado?
• Avaliar a profundidade do dano: É apenas o revestimento ou também danificou o couro? A estrutura está íntegra?
• Desenvolver um plano de reparo detalhado: Eles desenvolverão um plano de reparo detalhado, passo a passo, e fornecerão um orçamento claro.
• Segredos: Este é um testemunho da experiência. Eles podem ser capazes de determinar o método de curtimento do couro pelo toque e cheiro, e a causa do dano observando o padrão da rachadura.
Passo 3: Preparação Meticulosa "Pré-operatória"
• O que fazer: Este é um dos passos mais demorados e profissionais.
• Limpeza e Desengorduramento Completos: Use limpadores e desengordurantes de grau industrial, mais fortes, para garantir que a superfície reparada esteja absolutamente impecável. • Mascaramento Perfeito: Use fita adesiva de alta precisão e fluido de mascaramento para proteger perfeitamente cada ferragem, costura e borda do forro.
• Segredo: Os DIYers frequentemente negligenciam ou subestimam a importância deste passo. Os profissionais, por outro lado, dedicam um tempo considerável à preparação, sabendo que a preparação perfeita é metade da batalha para o resultado final.
Passo 4: Execução da Restauração "Direcionada"
• Correspondência de Cores:
• DIY: Comparações visuais repetidas sob luz natural.
• Profissional: Use um **colorímetro computadorizado (espectrofotômetro)** para ler os dados precisos de cor do couro e gerar uma fórmula base. Isso é então ajustado por coloristas experientes, alcançando uma correspondência superior a 99%.
Processo de Coloração:
• DIY: Principalmente aplicação manual com esponja.
• Profissional: Um aerógrafo é padrão. Em uma cabine de pintura profissional (equipada com exaustão e iluminação), múltiplas camadas finas de aerógrafo são aplicadas para criar um acabamento absolutamente uniforme, sem costuras, "de fábrica". Fixação e Acabamento da Cor:
• DIY: Use um acabamento monocomponente à base de água.
• Profissional: Frequentemente usam um acabamento bicomponente (2K) ou um acabamento com reticulante. Esses produtos requerem mistura com um agente de cura, que forma uma reticulação química após a secagem. Sua resistência à abrasão, arranhões e produtos químicos supera em muito a dos produtos monocomponentes, aproximando-se do nível de verniz automotivo. Eles também podem ajustar precisamente o nível de brilho do acabamento (de 0% fosco total a 90% alto brilho) com base nas configurações de fábrica.
Passo 5: Inspeção de Qualidade, Acabamento e Cura
• O que é feito: Após a conclusão do reparo, o reparo será cuidadosamente inspecionado sob diferentes iluminações (fria, quente e natural) para garantir cor e brilho uniformes. As ferragens serão limpas e polidas, e a manutenção básica será realizada em áreas não reparadas para garantir um acabamento uniforme.
• Segredo: Eles têm uma sala de secagem ou cura dedicada onde a temperatura e a umidade são controladas para garantir a cura química do revestimento de reparo em condições ótimas, garantindo a máxima resistência. Parte Dois: A Verdadeira "Arma Secreta" dos Profissionais
Se há um "segredo", não é uma poção mágica, mas sim um sistema abrangente de vantagens:
• Experiência
Eles têm centenas de estudos de caso armazenados em suas mentes, permitindo-lhes identificar rapidamente problemas e antecipar riscos. Essa intuição e julgamento não podem ser adquiridos lendo ou assistindo a vídeos.
• Produtos de Grau Industrial
Os produtos que eles usam geralmente não são vendidos ao público e apresentam concentrações mais altas, desempenho mais estável e formulações mais especializadas. Eles entendem a compatibilidade química de toda a sua linha de produtos e sabem quais limpadores, cores e acabamentos funcionam perfeitamente juntos.
• Equipamento Especializado de Precisão
Desde colorímetros computadorizados e sistemas de pulverização especializados até ferramentas aquecidas e almofadas de textura para retexturização, esses dispositivos alcançam precisão e resultados inatingíveis à mão.
• Compromisso com a Qualidade
Os profissionais prosperam com sua reputação e seu trabalho. Sua atenção aos detalhes, processo rigoroso e compromisso inabalável com o resultado final são as principais características de sua experiência.
Um Guia de Compra de Materiais e Produtos Restauradores
Antes de comprar, lembre-se do princípio mais importante: sempre que possível, compre produtos da mesma marca e linha de produtos. Os produtos profissionais de restauração de couro (especialmente aqueles relacionados à cor e fixação da cor) são quimicamente formulados para garantir compatibilidade perfeita. Misturar produtos de diferentes marcas pode levar a problemas imprevisíveis, como má adesão, reações químicas e cor irregular. Portanto, escolher uma marca respeitável e construir sua caixa de ferramentas em torno de sua linha de produtos é o caminho mais rápido para o sucesso.
Comparação de canais de compra online e offline
| Características / Dimensões de Comparação | Canais de Compra Online | Canais Offline |
|---|---|---|
| Vantagens Principais | Seleção incomparável e competitividade de preços | Correspondência precisa de cores e aconselhamento especializado presencial |
| Gama de seleção de produtos | Extremamente ampla: do nível de consumo em massa ao nível industrial profissional, marcas globais estão disponíveis, e o sistema de produtos é completo | Muito limitada: Geralmente existem apenas algumas marcas de manutenção mainstream, e é difícil encontrar um sistema de produtos de reparo profissional. |
| Nível de preço | Mais baixo: Fácil de comparar preços, frequentemente com descontos e acesso direto aos fabricantes | Mais alto: Inclui custos operacionais da loja, e os preços geralmente não são competitivos |
| Precisão da correspondência de cores | Baixa/Difícil: Depende da exibição da tela, tem sério risco de diferença de cor e não é adequado para correção precisa de cores | Alta/precisão: Você pode levar o produto real à loja e compará-lo com o cartão de cor físico para uma correspondência perfeita |
| Obtenha aconselhamento profissional | Limitado: Apenas atendimento ao cliente por texto ou e-mail disponível, sem diagnóstico físico | Valioso: Você pode se comunicar diretamente com funcionários experientes da loja ou mestres para obter conselhos direcionados e confiáveis |
| Conveniência e imediatismo | Conveniente, mas não instantâneo: os pedidos podem ser feitos 24 horas por dia, mas você precisa esperar pelo transporte logístico. | Instantâneo, mas não conveniente: compre e use imediatamente, mas exige uma viagem especial, e as lojas podem ser escassas |
| Referência de avaliação do usuário | Muito rica: Você pode consultar um grande número de fotos, textos e avaliações em vídeo de usuários reais para auxiliar na tomada de decisões | Quase nenhuma: Você só pode confiar no julgamento pessoal e nas recomendações do balconista da loja |
| Nível adequado para compra | Todos os níveis:<br> - Nível de entrada: Uma vasta seleção de kits tudo-em-um.<br> - Nível avançado/profissional: O único canal para adquirir um sistema completo profissional de correção de cor e restauração | Nível de Entrada:<br> - Adequado para comprar um primeiro conjunto de ferramentas básicas de limpeza e manutenção.<br> - Adequado para comprar produtos específicos sob aconselhamento de especialistas. |
| Principais riscos/desvantagens | Risco de diferença de cor ao comprar cores pré-misturadas; impossibilidade de verificar a textura real do produto | Poucas opções de produtos para atender a necessidades de reparo ligeiramente complexas |
Como Identificar Produtos de Reparo de Couro de Alta Qualidade
1. Profissionalismo e Direcionamento
Sinais de Alerta: Produtos que afirmam “limpar, condicionar e colorir três em um,” “adequados para todos os couros,” ou “refrescar com uma passada.” Este marketing excessivamente simplificado muitas vezes significa que a fórmula sacrifica a expertise especializada por uma cobertura de amplo espectro, resultando em resultados de curta duração e potenciais armadilhas.
Sinais Positivos: Marcas oferecem uma linha de produtos abrangente e segmentada. Por exemplo:
Limpeza: Eles oferecem tanto um “limpador suave” (para uso diário) quanto um “limpador de alta performance” (para limpeza profunda).
Manutenção: Eles oferecem um creme de cuidado para “couro acabado” e uma loção nutritiva especializada para “couro anilina.”
Reparo: Eles oferecem limpadores separados, desengordurantes, preenchedores, uma variedade de colorantes base e fixadores de cor em vários níveis de brilho (fosco, semi-brilho e brilho).
2. Transparência de Ingredientes e Fórmula Científica
Sinais de Alerta: Listas de ingredientes são vagas ou cheias de truques de marketing como “nanofator” e “fórmula revolucionária” sem qualquer informação real sobre a composição química. Marcas de Qualidade:
À Base de Água: Tanto para cor quanto para fixadores, à base de água é o padrão ouro para restauração profissional moderna. É mais seguro, tem menos odor e oferece maior flexibilidade do que os produtos tradicionais à base de solvente.
pH Neutro: Limpadores de alta qualidade serão claramente rotulados como “pH-neutro” ou “pH-balanceado,” garantindo que limpam sem perturbar o equilíbrio de pH original do couro e seu revestimento protetor.
Livre de Solventes Nocivos e Silicones de Baixa Qualidade: Bons produtos de cuidado usam ingredientes como lanolina e ceras naturais, em vez de dependerem apenas de silicones baratos para criar um brilho temporário e falso. Silicones de baixa qualidade podem entupir os poros e dificultar a restauração subsequente.
Fornecem Fichas Técnicas/de Segurança (TDS/SDS): As marcas mais profissionais fornecem fichas técnicas detalhadas ou fichas de dados de segurança para seus produtos, demonstrando seu mais alto compromisso com o profissionalismo e a segurança.
3. Compatibilidade do Sistema
Sinal de Alerta: A marca vende apenas alguns itens “mais vendidos” de forma dispersa e desorganizada.
Marca de Qualidade: A marca oferece um “sistema de restauração.” Seus pré-tratamentos, preenchedores, cores e fixadores são projetados para funcionar perfeitamente juntos. Isso garante uma adesão química e física ideal entre cada camada, da camada base à camada superior.
4. Reputação da Marca e Clientes-Alvo
Sinais de Alerta: O principal canal de marketing da marca são vídeos de comparação exagerados nas redes sociais, e seu público-alvo são principalmente consumidores comuns em busca de “soluções milagrosas de um minuto.”
Marcas de Qualidade:
Escolha Profissional: Se a base de clientes principal de uma marca são restauradores profissionais de interiores automotivos, restauradores de móveis ou centros de cuidado de artigos de luxo, então a qualidade e a confiabilidade de seus produtos já são reconhecidas pela indústria.
História e Reputação: Marcas com décadas de história e menções e recomendações repetidas por entusiastas e profissionais experientes em fóruns profissionais (como detalhamento automotivo e restauração de móveis) são geralmente muito confiáveis.
Preço Reflete Valor: Produtos de alta qualidade geralmente têm um preço premium devido a custos mais altos de P&D, matérias-primas de maior qualidade e desempenho mais consistente. Desconfie de “produtos de reparo milagrosos” com preços incomumente baixos.
5. Recursos Educacionais e Suporte ao Cliente
Sinais de Alerta: A embalagem contém apenas algumas instruções simples e o site oferece pouca informação. Uma marca de qualidade: O site oficial da marca ou os canais de mídia social oferecem recursos instrucionais extensos e detalhados:
Tutoriais em vídeo de longa duração detalhando cada etapa e precauções.
Artigos ilustrados explicando as causas e os princípios de reparo de vários problemas.
Suporte ao cliente profissional e responsivo está disponível para responder a perguntas específicas e técnicas.
Marcas e linhas de produtos conhecidas recomendadas
Aviso Importante: A lista a seguir não se destina a ser um anúncio comercial ou um ranking absoluto. Em vez disso, é uma referência compilada com base em avaliações públicas de usuários, discussões em fóruns profissionais e o foco das marcas em áreas específicas.
1. Colourlock (Lederzentrum): Originária da Alemanha, goza de alta reputação na restauração de interiores automotivos de alta gama.
2. Furniture Clinic: Originária do Reino Unido, oferece uma linha de produtos abrangente e excelente educação ao usuário, incluindo inúmeras ilustrações e vídeos instrutivos, tornando-a ideal tanto para profissionais de restauração DIY iniciantes quanto avançados.
3. Leather World Technologies: Originária dos EUA, é uma marca bem conhecida na indústria de restauração doméstica e automotiva. Seus produtos são profissionais e confiáveis, oferecendo uma gama abrangente de soluções, do básico ao avançado.