Welcome to the fabulous world of fabric and leather bonding, where creativity meets the sticky stuff! If you’ve ever tried to glue two disparate materials together, you know it can feel like an episode of a DIY reality show—high stakes, unexpected twists, and, of course, the looming threat of adhesive failure. Choosing the right adhesive is like picking the perfect dance partner: you need someone who can keep up with your moves and won’t leave you hanging at the crucial moment. Whether you’re crafting a chic leather handbag or mending a beloved fabric item, knowing how to select and apply the right adhesive will save you from future heartache and the dreaded “oops, it fell apart” moment. So grab your glue, and let’s dive into the art of bonding!
Choosing the Right Adhesive for Fabric and Leather
When embarking on a project that involves gluing fabric to leather, the choice of adhesive plays a pivotal role in determining the success of your bond. Not all adhesives are created equal; thus, it’s essential to choose one that is specifically formulated for the materials at hand. Look for contact cement, which is renowned for its strong, flexible bond and can handle the unique properties of both porous and non-porous surfaces. Additionally, specialized fabric adhesives designed for fabric-to-leather applications can offer similar benefits. These adhesives not only provide excellent initial tack but also remain flexible after curing, ensuring that the integrity of both materials is maintained, especially when they are subject to movement or stress. Before diving into your project, it’s imperative to read the manufacturer’s instructions carefully. This will help you understand the adhesive’s compatibility, drying times, and durability, ensuring that you select the best option tailored to your specific needs.
Preparing Surfaces for Optimal Bonding
To achieve a lasting bond between fabric and leather, proper surface preparation is key. Start by cleaning both materials thoroughly to remove any dirt, oils, or residues that could interfere with adhesion. For fabric, a mild detergent can effectively lift away any contaminants, while a damp cloth is ideal for cleaning leather without damaging its surface. Once both surfaces are clean, it’s beneficial to create a slightly textured finish on the leather. Lightly roughening the leather with fine-grit sandpaper can enhance the adhesive’s grip, allowing for a more secure bond. This texture increases the surface area for the adhesive to cling to, which is particularly important given leather’s smooth nature. Additionally, ensure that the edges of the fabric are trimmed neatly to avoid fraying, as this can detract from the final appearance and overall adhesion. By taking these preparatory steps, you significantly reduce the risk of peeling and ensure a robust bond that stands the test of time.
Step-by-Step Guide to Gluing Fabric to Leather
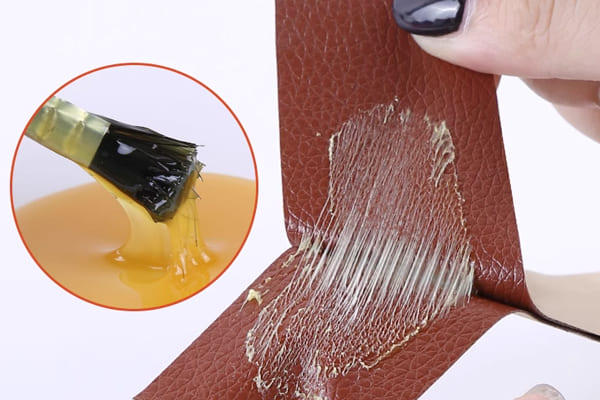
Once your materials are prepared, you can begin the gluing process. Start by laying your leather piece flat on a clean, dry surface, ensuring it’s stable and won’t shift during application. Using a brush or applicator, apply your chosen adhesive evenly to one side of the leather, being careful to cover the area fully without over-applying, which could lead to messy edges. Next, take your fabric and position it carefully on the leather, ensuring that all edges are aligned as desired. Press down firmly and use your fingers or a smoothing tool to eliminate any air bubbles that may have formed during placement. This step is crucial for ensuring maximum contact between the two surfaces, which directly impacts the strength of the bond. For enhanced results, consider using weights or clamps to hold the pieces together while the adhesive sets. This additional pressure can greatly improve the bond strength. After securing the pieces, allow adequate drying time according to the adhesive’s instructions; patience is key here. Once fully cured, your fabric-leather combination will be robust and ready for use, whether it’s for a project, repair, or creative endeavor.
Understanding Drying Times and Techniques
When working with adhesives for fabric and leather, understanding drying times and techniques is crucial for achieving a durable bond. The drying time can vary widely based on several factors, including the type of adhesive you choose, the thickness of the materials, and the environmental conditions, such as humidity and temperature. Most fabric glues require a minimum of 24 hours to cure fully, allowing the adhesive to reach its maximum strength and flexibility. In contrast, some contact cements can set in as little as 15 minutes, providing a quick bond for those in a hurry. However, it’s vital to resist the temptation to rush the process; a complete cure ensures that the bond can withstand stress and movement without failure. For larger projects or thicker materials, you might opt for a slower-drying adhesive. This type allows for repositioning of the materials before setting, giving you the flexibility to make adjustments as needed. Additionally, applying gentle heat—such as a hairdryer on a low setting—can accelerate the drying process, but take care to avoid overheating, as this could damage the leather or fabric. Always adhere to the manufacturer’s guidelines for drying times and techniques to ensure optimal results.
Tips for Maintaining a Strong Bond
Maintaining a strong bond between fabric and leather requires proactive care and attention. One of the most important considerations is to avoid exposing the glued area to excessive moisture, as water can weaken the adhesive over time, leading to peeling or lifting. If your item will be used in environments where it might encounter water, consider treating it with a waterproofing spray specifically designed for both fabric and leather. This protective layer can help shield the adhesive from moisture damage. It’s also a good practice to regularly inspect the seams and edges of your project for any signs of wear or lifting. Addressing these issues promptly can prevent further deterioration and extend the life of your item. Proper storage is another key factor in maintaining your fabric-leather bond. Store the item in a cool, dry place, as extreme temperatures or humidity can affect the integrity of the adhesive. Finally, if your item is subject to frequent use, handle it with care. Avoid pulling or tugging at the bonded areas, as excessive stress can compromise the bond. By following these maintenance tips, you can ensure that your fabric and leather project remains strong and intact for years to come.
Conclusion
In the grand tapestry of DIY projects, gluing fabric to leather is a task that, when done right, can turn an ordinary item into a stunning piece of art. Think of it as crafting a superhero duo: fabric brings the flair, while leather adds durability, creating a partnership that’s both functional and fabulous. By choosing the right adhesive and following proper techniques, you can forge a bond that stands the test of time—and perhaps a bit of rough handling! Remember, just like any good relationship, communication (or in this case, preparation) is key. So, treat your materials with care, check in regularly for wear and tear, and you’ll have a fabric-leather masterpiece that not only looks great but also stands strong against the tests of daily life. Happy crafting, and may your glue never run dry!


