


Introduction
Embossing faux leather fabric can transform simple materials into personalized, textured creations, perfect for crafting unique accessories or home décor. This process involves creating raised or recessed designs, and while it’s commonly done on real leather, it can also be adapted for faux leather with the right techniques. Let’s explore how to do it, keeping it simple for beginners and highlighting key steps and tips.
Methods Overview
There are two primary ways to emboss faux leather fabric, each with its own approach:
- Heat Embossing with VersaMark: This method uses heat to set a design, ideal for smaller projects like wallets or book covers. It involves stamping with VersaMark ink, adding embossing powder, and using a heat tool to melt it into the fabric.
- Heated Stamp with Arbor Press: For more advanced users, this method uses a heated metal stamp and an arbor press to apply pressure, creating crisp, professional designs. It’s better for larger or more detailed projects but requires specific equipment.
Both methods work, but heat control is essential, as faux leather can melt if overheated. Always test on a scrap piece first to find the right temperature.
Key Steps and Tips
For heat embossing, start by cutting your faux leather, stamping with VersaMark, adding clear embossing powder, and heating until it melts—keep the heat tool moving to avoid damage. For the arbor press method, heat a brass stamp to 70-100°C, position it, and apply pressure for a few seconds.
An unexpected benefit is that imperfections, like spotty embossing, can create a vintage, character-rich look, adding charm to your projects. Choose thicker, high-quality faux leather to prevent melting, and wear heat-resistant gloves for safety.
Creative Uses
You can use embossed faux leather for custom bags, wallets, book covers, or even jewelry, making it a versatile craft for personalizing gifts or home items. This flexibility makes it a fun, cost-effective way to refresh your crafting repertoire.
Survey Note: Detailed Analysis of Embossing Faux Leather Fabric
This detailed analysis explores the feasibility, methods, materials, and creative applications of embossing faux leather fabric, providing a comprehensive guide for DIY enthusiasts. The discussion is informed by various crafting techniques, tool recommendations, and user experiences, ensuring a thorough understanding of the topic as of 05:24 AM PDT on Wednesday, April 9, 2025.
Introduction and Background
Embossing is the process of creating raised or recessed designs on a surface, often used to add texture and personalization to materials like leather. Faux leather, made from synthetic materials such as PVC or polyurethane, is a popular alternative due to its affordability and ease of use. While traditionally associated with real leather, embossing faux leather fabric is increasingly common in DIY projects, offering a way to create custom bags, wallets, and home décor. This analysis will cover the methods, precautions, and creative ideas for embossing faux leather, addressing both beginner-friendly and advanced techniques.
Feasibility: Can It Be Done?
Yes, it is feasible to emboss faux leather fabric, and the process can be adapted from leatherworking techniques. Research suggests that heat is a key factor, as faux leather lacks the natural grain structure of real leather, requiring special tools and temperature control. User experiences indicate that while possible, results can vary, with some achieving crisp designs and others encountering spotty or melted areas. This variability highlights the importance of testing and choosing the right materials, making it a complex but achievable craft for those willing to experiment.
Materials and Tools Required
To emboss faux leather fabric, the following materials and tools are essential:
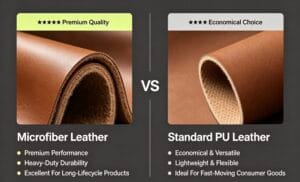
- Faux Leather Fabric: Opt for high-quality, thicker materials to withstand heat. Low-grade faux leathers like pleather may not hold up to pressure and heat, potentially melting or deforming.
- Heat Embossing Powder: Clear embossing powder is recommended for subtle effects, with colored options available for bolder designs.
- VersaMark Ink Pad: A clear, water-based ink used for heat embossing, ensuring the powder adheres before heating.
- Heat Tool: A heat gun or embossing heat tool, typically 1000-2000W, is crucial for melting the powder or heating stamps.
- Stamps or Stencils: Rubber stamps with bold designs or custom stencils for unique patterns.
- Bone Folder or Stylus: For creating patterns by removing excess powder in heat embossing.
- Heat-Resistant Gloves: Essential for safety when handling hot tools or stamps.
- Arbor Press (Optional): For advanced users, a 0.5-1 ton arbor press applies even pressure for crisp embossing.
- Brass or Metal Stamps (Optional): Used with the arbor press, heated to 70-100°C for clear debossing.
- Work Surface: A sturdy, heat-resistant surface like a wooden board or craft mat to protect your workspace.
hese materials ensure a range of options, from beginner-friendly heat embossing to more technical arbor press methods, catering to different skill levels and project needs.
Method 1: Heat Embossing with VersaMark
This method is accessible for beginners and involves heat embossing techniques commonly used in paper crafting, adapted for faux leather. The steps are as follows:
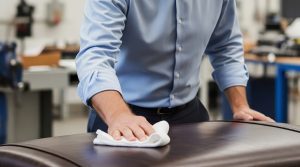
- Prepare Your Faux Leather: Cut the faux leather to the desired size and clean the surface with a soft cloth to remove dust or debris.
- Stamp VersaMark Ink: Ink your stamp with VersaMark and press firmly onto the faux leather, covering the area with the design. For larger areas, work in small sections.
- Apply Embossing Powder: Pour clear embossing powder over the inked area, then tap off excess. For custom designs, use a stencil and apply ink through it with a sponge or brush before adding powder.
- Create Texture (Optional): Use a bone folder or stylus to draw patterns into the powder, pressing hard to remove some powder for a leather-like effect.
- Heat Emboss: Hold the heat tool 2-3 inches away, moving in small, circular motions until the powder melts and becomes shiny. Be cautious to avoid overheating, as faux leather can melt.
- Let It Cool: Allow the embossed area to cool completely before handling, ensuring the design hardens.
- Finish Your Project: Assemble your project, such as attaching the embossed piece to a bag or wallet.
Tips for Success:
- Always test on a scrap piece to determine the right heat level and duration.
- Keep the heat tool moving to prevent melting, especially on thinner faux leather.
- Embrace imperfections, as spotty embossing can create a vintage, character-rich look, an unexpected benefit for creative projects.
This method is ideal for smaller, detailed designs and requires minimal equipment, making it accessible for home crafters.
Method 2: Using a Heated Stamp with Arbor Press
For advanced users or those with access to specific equipment, this method uses a heated stamp and arbor press for crisp, professional-grade embossing. The steps are:
- Prepare Your Faux Leather: Cut to size and ensure it’s clean, free of debris.
- Heat the Stamp: Use a heat gun to warm a brass or metal stamp to 70-100°C, testing periodically to avoid overheating. Wear heat-resistant gloves for safety.
- Position the Stamp: Place the heated stamp centrally on the faux leather, ensuring alignment for the design.
- Apply Pressure with Arbor Press: Position under a 0.5-1 ton arbor press, apply moderate pressure to the handle, and hold for a few seconds to create a clear debossed design.
- Check the Result: Lift the stamp and inspect; reapply pressure if needed for deeper embossing.
- Cool and Finish: Let the faux leather cool completely before handling, then assemble your project.
Tips for Success:
- Ensure even pressure with the arbor press for clean results.
- Monitor stamp temperature closely, as excessive heat can damage faux leather.
- Practice on scrap pieces to perfect the technique, especially for those new to arbor presses.
This method is more technical, requiring equipment like an arbor press, but it’s suitable for larger projects or those seeking a traditional leather embossing look.
Creative Ideas and Applications
Embossed faux leather opens up a world of creative possibilities, including:
- Custom Bags: Emboss patterns or initials on tote bags or clutches for personalized gifts.
- Book Covers: Transform plain notebooks or journals into luxurious-looking accessories with embossed designs.
- Wallets and Purses: Add intricate motifs or monograms for a high-end finish.
- Home Décor: Create embossed faux leather coasters, picture frames, or decorative panels for a unique touch.
- Accessories: Make belts, headbands, or phone cases with unique embossed designs, adding character to everyday items.
- Jewelry: Use small embossed pieces for earrings or bracelets, offering an unexpected application for craft enthusiasts.
These ideas highlight the versatility of embossed faux leather, making it a cost-effective way to create professional-looking items at home.
Precautions and Troubleshooting
Embossing faux leather requires caution due to its synthetic nature. Common issues and solutions include:
- Melting: Faux leather can melt under excessive heat. Test on a scrap piece first, keep the heat tool moving, and avoid prolonged exposure.
- Spotty Embossing: If using heat embossing powder, ensure even VersaMark ink coverage and tap off excess powder carefully. This can create a vintage look, which may be desirable.
- Choosing the Right Material: Thicker, high-quality faux leather is less likely to melt or tear. Avoid low-grade pleather, as it may not withstand pressure or heat.
- Heat Resistance: When using an arbor press, ensure the faux leather can handle the stamp’s heat. Test on a small area to confirm.
- Safety: Wear heat-resistant gloves and work in a well-ventilated area to avoid inhaling fumes from heated synthetic materials.
These precautions ensure a safer, more successful embossing experience, addressing potential challenges for DIY crafters.
Conclusion and Recommendations
In conclusion, embossing faux leather fabric is a feasible and rewarding DIY skill, offering customization and texture for various projects. The heat embossing method with VersaMark is beginner-friendly, while the heated stamp with arbor press suits advanced users with specific equipment. Both methods require careful heat control to avoid melting, with testing on scraps recommended. Creative applications range from custom bags to jewelry, with the unexpected benefit of embracing imperfections for a vintage look. For those unsure, start with small projects and consult crafting communities for tips, ensuring a fulfilling crafting journey.